*Disclaimer: all captures in this post were anonymized using TraceWrangler.
I was recently asked to help with a performance issue. I was informed a transfer was going to take weeks instead of a couple days as expected. The transfer rate was getting 80Mbps throughput max on a 10Gbps connection. So, I setup captures at both ends and got to work. This is just a quick summary of that work with the classic tell-tale signs of a performance problem.
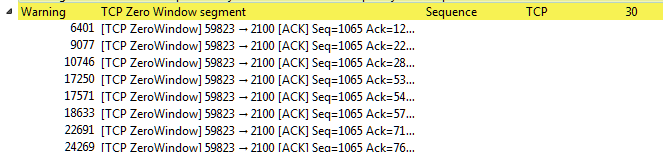
The first thing I noticed were 30 zero window segments in a matter of seconds in the “Expert Information” window. One or two might be tolerable under normal circumstances, but 30 is something of interest. Small TCP window sizes and zero window packets generally mean there is a problem with one of the end devices.
This grabbed my attention, so I moved back to the packet list. When looking at the Zero Window packets I noticed delays anywhere from 100 to 300 ms before the Window Update. (If you don’t have a TCP Delta/Delay column setup already in your instance, I highly recommend it!)
TCP Zero Window follow by a delay
This was also clearly evident in the Time Sequence Delay graph. This is a classic example of the “stair step” graph. This should look more like a diagonal line up to the right. The receiving end cannot keep up with the data flow and is slowing the traffic.
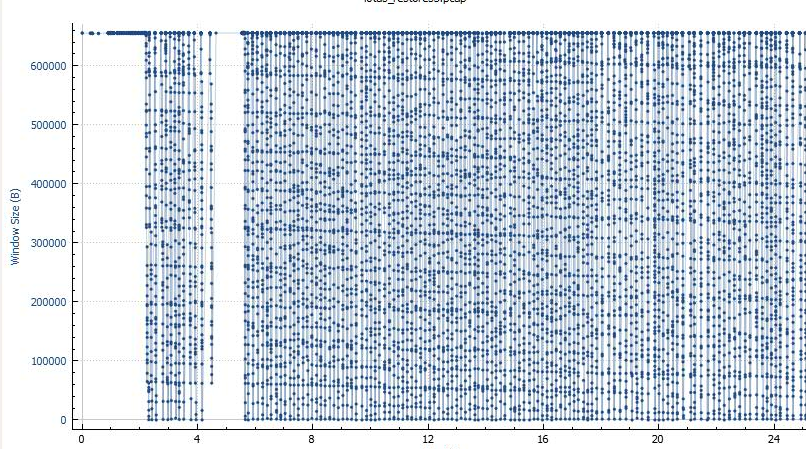
Reviewing the Window Size graph revealed an even more disturbing picture. It seems the server couldn’t keep up at all with the incoming data. The window sizes dropped rapidly, and they all delayed before the acknowledgement and window update.
I decided to glance at the TCP options in the packets of the TCP handshake. The calculated window sizes and maximum segment size looked good. The Window scaling leaved something to be desired. Packet TCP Options
These were all classic symptoms of a performance issue on the receiving server. In this case, the server admin performed a few network tweaks and adjusted settings in the security software resulting in the disappearance of the reducing window sizes/zero window packets (the visible network symptom of root cause). Consequently, the delays were shortened and performance increased. Unfortunately, the day took a quick turn and I was unable to capture the new data to get a “before and after” snapshot or ask what “tweaks” he made specifically, but the results speak for themselves. Another performance issue resolved, another happy customer, and a cookie cutter example of performance indicators in Wireshark.
For 13 years networking was my profession with a specialized focus on proactive and reactive performance analysis. More recently I have embraced the AWS platform. This blog reflects my experience both past and present.
If you have followed the posts in this series, Part 3 left us with the following completed:
Diagram of our architecture IAM roles S3 bucket and its policies The next step is to build the EC2 server.
Requirements In order to do this properly, you’ll need to meet or exceed the minimum system requirements published by Ubiquiti. You can find those officially here, but at the time of this writing they are as follows:
Continuing on from Part 2 where we created the required IAM group, user, and policies we get to the exciting part…building! The first step is to create the storage backend. In this case we’re utilizing Amazon Simple Storage Service (S3). As usual, I will refer you to AWS’s docs for the official S3 guide for creating the bucket. The process itself is very simple, but there are a few details to pay attention to specifically regarding this application.
Part 1 of this series outlined the architecture, which is then followed by creating the IAM group, user, and policy the EC2 will use to place recorded video in the S3 bucket.
Open the IAM console Create a group (I named mine ‘unifi’) Attach a policy to the group. This is an example policy that I created in the visual editor. You can open it or restrict it to fit your specific needs as this is not the most restrictive policy example.
Like many of you, I am watching the AWS re:Invent keynotes and announcements remotely. Being network and performance focused here are the announcements I am currently most excited about. I will update this list as the week progresses.
VPC ingress routing now makes routing to virtual appliances easier! This is a much welcomed improvement as routing inside the VPC has always been a bit tricky and cumbersome.
https://aws.amazon.com/about-aws/whats-new/2019/12/amazon-vpc-ingress-routing-insert-virtual-appliances-forwarding-path-vpc-traffic/
Transit Gateway Manager manages and monitors the on-prem to cloud networks centrally and easier.
Trump is the first U.S. President to bring religious freedom as a main point of discussion before the U.N. Whether you subscribe to an organized religion or not religious freedom is central to a free society. The ability to adhere to personal sincerely held beliefs is the ultimate freedom of choice. You cannot have free speech or access to any other God-given rights without first having freedom of belief, thought, and emotion.
There are some gaps and changes to this that I have not completed or corrected. I am currently working on another project. Please contact me if you are using this as a guide and would like a little help. I will get back to this tutorial at a later date.
**_Notice: I am not an official representative or affiliate of Ubiquiti or AWS. The process outlined below represents the high-level steps I used to successfully launch this application myself.
As promised, CloudFlare delivered HTTP/3 this week. If you don’t know what this is and what it could mean for web browsing in the future I highly recommend reading their blog and other sites about it. HTTP/3 brings another fundamental shift to transport protocols by building on the lessons learned from TCP and UDP. I’m particularly intrigued to see HTTP requests begin before the handshake is complete. CloudFlare released it to their customers who signed up to enable it early.
Purpose This can be used to fade sounds in/out by adjusting their volumes using a pedal or the wheel. You can even fade one sound in while fading the other out. It can also be used to apply effects, such as ‘wah’ to the pads.
The Morph allows you to control several parameters at once with one “source” You can use a foot pedal, wheel, or “aftertouch” to control different parameters or effects.
This week I attended my first AWS Immersion Day. The event was hosted by Justin McWhirter [justindm.me]. The focus of the day was serverless, and was centered around the Wild Rydes Workshops. By the end of the day we ended up with a web application that looked like this that was built upon many integrated AWS services such as Cognito, Kinesis, S3, Lambda, Amplify, API Gateway, and more. As someone who spends my time generally focused on networking within AWS this was a welcomed change of pace and a good learning experience.
This summer I have been working on recording keyboard parts for my church’s next set of worship videos. I have shared the previous worship videos, Christmas programs, a couple of covers, and originals on this site, but I have never shared any of the “behind the scenes” work. I thought I would take the time to share a sample of that now.
In this video I have panned all of the parts I created to the left ear.